
How to Diagnose and Restore Classic Car Electrical Systems Safely
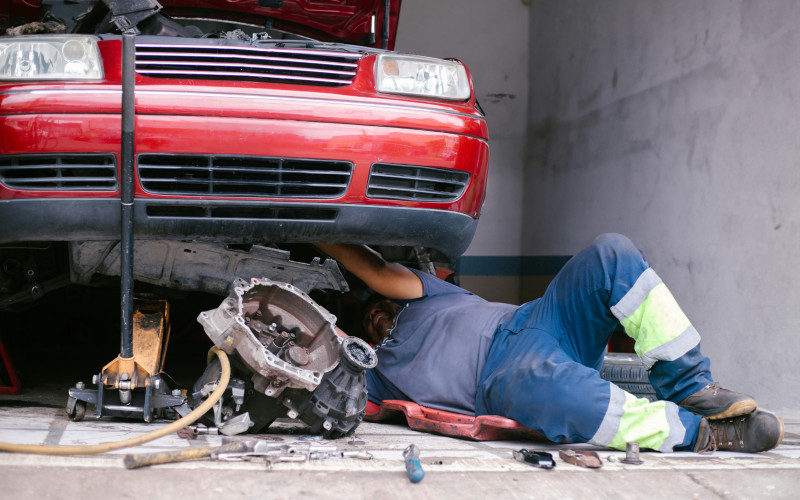
Restoring a classic car is a thrilling experience for any auto enthusiast. Beneath the polished chrome, fresh paint, and roaring engine lies one of the most critical yet often overlooked components—the electrical system. Whether you’re working on a 1950s roadster or a 1970s muscle car, ensuring that the wiring and electrical components are properly restored is key to both function and safety.
Classic cars were built in an era before modern electronics became standard, which makes their systems simpler in design but also more prone to issues. Understanding how to identify, repair, and upgrade the electrical system helps bring your vintage ride back to life with reliability and confidence, while adding modern technology that is as good or better than new cars.
Understanding the Basics of Classic Car Electrical Systems
Most classic cars use a simple 6- or 12-volt electrical system designed to power essential components such as the ignition, lighting, starter motor, and gauges. Unlike today’s vehicles with complex computer networks, early wiring systems relied heavily on straightforward mechanical switches and analog circuits.
Over the decades, however, antique car wiring can degrade due to heat, corrosion, or wear. Insulation becomes brittle, connectors loosen, and grounding points may rust. These problems can cause frustrating electrical failures or, worse, pose a fire risk.
Before diving into repairs, it’s crucial to check electrical system components thoroughly—battery terminals, fuses, switches, and grounding connections. A simple continuity test or voltage check can reveal hidden faults that might otherwise go unnoticed.
Common Electrical Problems in Classic Cars
Even the most beautifully restored cars can suffer from electrical gremlins. Some of the common electrical problems in cars—especially older models—include:
- Corroded Connections: Moisture and oxidation can cause poor conductivity, leading to flickering lights or intermittent power loss.
- Worn-Out Wiring: Decades-old wires often have cracked insulation or exposed copper, increasing the risk of short circuits.
- Faulty Grounds: Classic vehicles rely on metal chassis grounding. Rust or paint between connections can interrupt current flow.
- Aging Switches and Relays: Time and vibration wear down internal contacts, causing inconsistent operation of lights or ignition systems.
- Weak or Dead Battery: Extended storage periods or infrequent use can drain classic car batteries, especially in cold climates.
Recognizing these problems early and addressing them correctly ensures your restoration is not only beautiful but dependable on the road.
At D&C Classic Garage, we specialize in diagnosing and repairing these exact issues. Our experienced team in Sparks, NV, knows how to trace electrical faults, replace damaged wiring, and restore your classic’s system to full functionality while maintaining its authentic look.
Diagnosing and Testing Vintage Electrical Systems
Before replacing anything, conduct a detailed electrical inspection and check your classic car for signs that it may need a professional restoration to ensure you’re addressing deeper electrical issues, not just surface ones. Start with the basics—battery voltage, alternator output, and starter draw. If your car has been sitting for years, remove the battery and clean all terminals. Check for frayed wires, loose connectors, and brittle insulation.
For more advanced testing, use a multimeter to measure voltage drops, continuity, and resistance throughout circuits. Compare readings with the vehicle’s original wiring diagram to detect inconsistencies. If you don’t have a factory manual, many classic car forums and restoration books provide detailed diagrams and wiring color codes.
When working with antique car wiring, label each wire during disassembly and take pictures before you start, and throughout the process. This gives you a visual image that makes reassembly easier and helps prevent connection mistakes that could damage delicate components.
Restoring Antique Car Wiring: Replace or Repair?
One of the biggest decisions in restoring a classic car’s electrical system is whether to repair existing wiring or replace it entirely. In most cases, the answer depends on the vehicle’s age and condition.
If the wiring is only mildly worn, you might be able to repair specific sections by splicing in new wire and using high-quality connectors. However, if the insulation is crumbling or the system has been modified multiple times over the years, a full replacement is often safer.
Modern replacement harnesses are designed to mimic original layouts but use higher-quality materials and insulation that can withstand heat and vibration better than older ones. When purchasing replacement vintage car electrical parts, choose reliable suppliers who specialize in classic vehicles. This ensures the connectors, colors, and terminal styles match the car’s factory specifications, maintaining authenticity while improving safety.
Upgrading for Safety Without Losing Authenticity
Many owners worry that upgrading their car’s electrical system will compromise its originality. However, subtle improvements can enhance reliability and safety without altering the classic look.
For example, converting a 6-volt system to 12 volts can improve starting power, lighting brightness, and accessory compatibility. Using a modern alternator instead of an old generator offers more consistent power delivery, especially if you’ve added accessories like electric fans or upgraded sound systems.
When installing vintage car electrical parts, always use proper fuses or circuit breakers. Early cars often lacked sufficient circuit protection, making them vulnerable to wiring fires. Adding inline fuses and relays where appropriate is a smart, nearly invisible way to prevent electrical overloads.
Heat-resistant wiring sleeves, modern insulation, and hidden ground straps can also make your system more dependable while keeping the under-hood appearance authentic.
7 Tips for Restoring Classic Car Electrical Systems
- Document Everything: Before removing any wire or component, take detailed photos of the engine bay and dashboard wiring.
- Label and Organize: Use numbered tags or masking tape to mark wires and connectors during disassembly.
- Clean Thoroughly: Remove rust, corrosion, and debris from connection points, fuse boxes, and mounting brackets.
- Inspect Grounds: Clean every grounding point with sandpaper or a wire brush and reattach securely.
- Use Correct Gauge Wire: Always match the original wire thickness for proper current capacity and safety.
- Solder and Heat-Shrink Connections: Avoid quick crimp connectors; solder joints are more durable and conduct better.
- Test Before Reassembly: Once the wiring is installed, check electrical system function before reinstalling trim or panels.
Attention to detail during this process ensures the system performs flawlessly when you finally turn the key.
Choosing Quality Vintage Car Electrical Parts
Finding the right vintage car electrical parts can make or break your restoration project. Cheap or mismatched components may seem like a good deal but often fail prematurely or cause compatibility issues.
Stick to suppliers known for classic car restoration parts. Look for reproduction harnesses made with period-correct wire colors and terminals. Original equipment manufacturer (OEM) style connectors ensure that switches, relays, and accessories fit properly without modification.
When it comes to switches, relays, or gauges, refurbished original components are often preferable to modern substitutes. If you must use modern replacements, hide them discreetly to preserve the original dashboard appearance.
Preventing Future Electrical Problems
Once your car’s electrical system is restored, maintenance becomes the key to keeping it reliable for years.
- Regularly check battery terminals for corrosion and apply dielectric grease to prevent oxidation.
- Inspect wiring annually for signs of wear, especially near heat sources like exhaust manifolds.
- Avoid overloading circuits by adding too many accessories to a single power source.
- Keep the system dry, as moisture accelerates corrosion and short circuits.
Classic cars that sit idle for long periods benefit from trickle chargers to maintain battery health. Periodically check electrical system performance by verifying charging voltage and lighting brightness to spot early signs of trouble.
Ready to Restore Your Classic Car’s Electrical System?
If your vintage vehicle is showing signs of wiring wear, flickering lights, or ignition troubles, don’t wait until a small issue becomes a serious safety risk. Contact D&C Classic Garage today to schedule a consultation. Our experts can diagnose and repair common electrical problems in classic cars and source quality electrical parts for a flawless finish.
Bring your dream car back to life—safely, reliably, and authentically. Call D&C Classic Garage at (775) 420-5553 or visit our garage in Sparks, NV, to start your restoration journey today.
FREQUENTLY ASKED QUESTIONS
Why do older cars often have electrical problems?
Classic vehicles were built with simpler electrical systems that used basic wiring and mechanical switches. Over time, exposure to heat, vibration, and moisture can cause insulation to dry out, connectors to corrode, and wiring to become brittle. These age-related issues make electrical faults more common in older cars than in modern vehicles.
Can I keep the original wiring in my classic car?
You can, but only if it’s in good condition. Original wiring adds authenticity, but safety should always come first. If the wires are cracked, frayed, or have been patched multiple times, it’s safer to install a reproduction wiring harness that matches the original design but uses modern, more durable materials.
How do I know if my car’s electrical system needs professional help?
Signs include dim or flickering headlights, fuses that blow repeatedly, non-functioning gauges, or a slow-starting engine. If you’ve checked the battery and connections but still experience electrical issues, it’s best to let professionals inspect it. At D&C Classic Garage, our team uses precise diagnostic tools to locate and fix the root cause quickly and effectively.
How often should I inspect the wiring in my restored classic?
A yearly inspection is ideal—especially if the car is driven regularly. Look for signs of wear, corrosion, or loose connections. Cars that sit in storage should also be checked before driving again, as moisture or rodents can damage wiring over time.
Can D&C Classic Garage fix electrical issues without changing my car’s vintage look?
Absolutely. Our restoration experts focus on preserving originality while improving reliability. We use reproduction harnesses, period-correct connectors, and discreet safety upgrades to ensure your car performs dependably without altering its authentic charm.
RELATED POSTS
Whether you own a classic muscle car, a daily driver, or a weekend project vehicle, knowing how to use a jack for a car is an essential skill. A car jack allows you to safely lift your vehicle for tire changes, brake inspections, suspension work, and many other maintenance tasks. However, lifting a vehicle incorrectly can lead to serious damage or injuries.
Classic cars turn heads for a reason. Their paint, chrome, leather, and original trim capture the design and craftsmanship of another era. However, sunlight can quietly destroy those details over time. UV rays fade paint, dry out leather, crack dashboards, and weaken vinyl interiors. If you want your investment to stay beautiful and valuable, you need a smart plan for long-term protection.
Classic cars turn heads in every season, but summer creates unique challenges that owners cannot ignore. High temperatures, intense sunlight, and long road trips put extra stress on older engines, cooling systems, paint, and interiors. A well-maintained classic car can handle summer heat with confidence, but neglect often leads to overheating, faded finishes, and expensive repairs.
Classic car enthusiasts often search for the most thorough and precise way to rebuild their vehicles. Among all available methods, rotisserie restoration stands out as the gold standard. It delivers unmatched access, accuracy, and long-term value. If you’ve ever wondered why professionals rely on this approach, this guide breaks it down in clear, practical terms.